CelluClay Mission Project
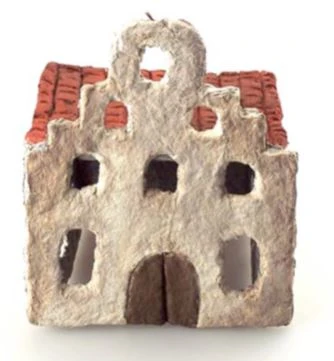
The Mission in the photo was created with CelluClay Instant Papier Mache, white glue,
toothpicks and 3 colors of paint. The drying time on this project will vary depending on
the thickness of the CelluClay and weather conditions, but you can expect that it will take
a couple of days to dry.
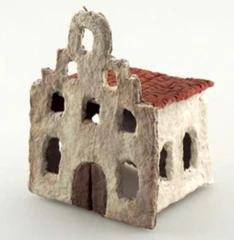
If you are in a hurry and you need this finished fast you can use Wire Mesh and Rigid
Wrap and achieve almost the same results. The basic instructions for this technique will
be explained at the end these instructions.
Material:
• 1 -One pound package CelluClay
Instant Papier Mache
• White craft glue
• 2-toothpicks
• Off -White, Brown, & Brick Red
acrylic paints
• A paintbrush
• Measuring cup, one-cup size
• Heavy gallon size zip lock bag
• Water
• Paper plate
• Paper towel
• Paper for pattern
• Scissors
• Plastic Wrap
• Plastic Knife
Instructions:
The amount of Celluclay you will need will depend on the size of the Mission you are
building 3 cups of dry Celluclay mixed with 1 ½ cups of water will make a medium size
Mission. Use more for a bigger building, less for a smaller one.
1. Create pattern pieces on paper, front, 3 sides and roof. Cut out.
and knead until all the dry CelluClay and water are mixed well, if it is too dry add
more water, too wet add dry CelluClay.
1/3” thick. Lay the pattern pieces on top of the CelluClay cut around them with a
plastic knife. Cut out the windows and other openings. Save the pieces in the
plastic bag.
tiles.
so that air can get around all sides, this will help the pieces dry faster. Place in
front of a fan if desired.
pieces before they are put together.
around the edges and around all the openings. Paint the door brown. Paint the roof
brick red, when the paint is dry, thin down some brown paint with water and paint
it over the brick red paying special attention to getting it into the grooves in the
roof.
knead together. Otherwise mix one half-cup CelluClay, one-fourth cup water and a
tablespoon of white glue.
the paint when you are finished. Use the CelluClay mixture like cement, put it on
the edges of the walls and press together, smooth it out, when all the walls are
together set aside to dry, when dry, put some more of the mixture around the top
of the walls and put the roof on, fill in any holes with the mixture. Touch up the
paint as needed.
Rigid Wrap Mission
1. Lay pattern pieces on the Rigid Wrap, for good strong walls use 4-5 layers. Stack
the pieces dip in water and spread out on plastic wrap to dry.
put the roof on. If you want you can cover the Mission with CelluClay it will look
more like adobe.
Designed by: Carolyn Stearns