Make this wonderfully realistic Cabin using Activ-Clay
Material:
2 One pound packages Terra Cotta
ACTIVA Activ-Clay
Acrylic Paint:
Dark Brown
Off White
Brick Red
White Craft Glue
Paint brush
Water basin
Toothpick
Rolling Pin
Plastic Wrap
Plastic knife
Instructions:
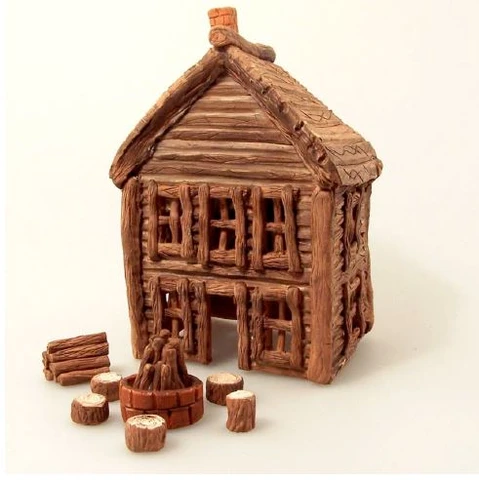
Note: This log cabin was constructed in pieces, 4 sides, the roof and the chimney. It measures 6”
x 6” x 7” tall. You can make it any size but may need to increase the number of packages of
Activ-Clay. This log cabin can be made two ways, you can roll coils and stack them together or
you can roll out slabs cut the walls out and carve the grooves in the walls. The one pictured was
made with the slab method. Keep extra clay in an air tight bag or covered with damp paper towel
so the clay does not dry out.
4” up to where the angle goes towards the peak, 3” to the peak. The sides are 6” x 4”.
a plastic knife.
the round end of the paint brush carve the grooves (logs) from side to side.
each window or cut out one opening and then put the muttons back in.
this to make the trim pieces for around the doors and windows. Press in place and trim as
necessary.
while the white glue is drying use hot glue on the seams on the inside.
they are dry, when dry glue onto the corners of the cabin with white glue.
create the look of bark and use the round end of the paint brush to make the grooves. It
should hang over all sides about ½”, so measure the opening before you cut the clay. Lay
the sheet of clay over the sides, press down lightly and let dry.
along the top of the roof. Press on lightly remove, let dry, glue in place once dry.
an angle to fit on the roof, set aside to dry. When dry glue to the roof.
pieces 1” long. Put 4 on the bottom then 3, then 2 then one. Glue together when dry if
necessary.
Bring the ends together forming a ring, set aside to dry.
leaving more paint in the grout lines.
cabin and all the other logs, wipe with a paper towel leaving more paint in the grooves.
Project Designer: Carolyn Stearns