Make this original Air Dry Clay Necklace with Activ-Clay
Materials
1 - Package White Activ-Clay
1 - Poly Blade by AMACO
1 - 20 Ft. Spool Beadalon Gold .015 Bead Stringing Wire
1 – 1 Ounce Package, Bead Heaven Amber Sm. glass beads
1 - (Three gram) Package Size 2, Beadalon Gold Plated Crimp beads
1 - (Two gram) Package Size 1, Beadalon Gold Plated Crimp beads
1 - Beadalon Crimping Tool
1 - 16 piece Package of Crystal Innovations Swarovski Crystal Beads TOPAZ
1 - (17 grs) Tube of Blue Moon Topaz glass pony beads
1 - 2 fl. oz. Folk Art Artist Pigment Raw Sienna Acrylic Paint.
1 - Package (assorted sizes) Hirschberg& Schultz Co. Jump Rings
1 - Package Hirschberg& Schultz Co. Gold plated Lobster claw clasps
1 - Pair Hirschberg & Schultz Co. Needle-Nose Pliers, Pencil, scissors, sponge, paper plate,
and small plastic container for water.
INSTRUCTIONS:
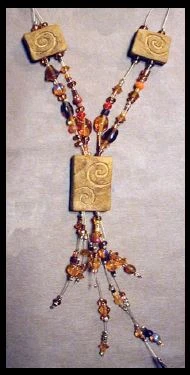
1. Dampen your hands and then form and flatten 2 rectangles of Activ-Clay that are ¼” thick,
1” long and ¾” wide. Cut one of these rectangles in half creating two smaller same sized
rectangles.
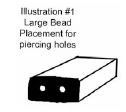
rectangular bead you will make two holes running parallel to each other
through the vertical length of the bead. Space the holes ¼” apart at the
center on the bead’s edge. (See Illustration #1) Make a couple of passes in
both channels from both directions (top to bottom to top). Reshape, smooth
and flatten if necessary being careful not to close up your holes.
opposing spirals, making one slightly larger at the
top. Repeat this process on the smaller beads
only making one spiral per bead, filling most of
the face of the bead. Let beads dry. (See
Illustration #2)

paintbrush to mix in water to thin the paint and create a wash. Dip a dry sponge in and then
dab off excess paint until very little is left in the sponge. Next dab over the entire surface of
your beads as you see fit. Making them look aged and more valuable.
6. Cut four 26” strands of Gold stringing wire.
second (jump ring) strand.
added in which you will separate the strands and decorate them individually. To do this start on the lobster claw (L.C.) strand, separate the two wires. You will be randomly suspending small groups of beads on each wire before going down into one of the small Activ-Clay rectangular beads. Do this by first stringing a crimp bead on one of the wires and crimp it.
Next add a combination or group of selected beads of your choice (between 3 – 8 beads) and then string on a second crimp bead (and crimp) to hold them in place.
You must MAKE SURE to leave at least ½” of space wire at the end of each wire, at the
bottom 2” inch length of space (before the Activ-Clay bead). See Illustration #3, after that
half inch of space string one Size one crimp bead, crimp it and string 1 topaz pony bead before running the wire down through the right hole of the small rectangular bead. (Spiral face up)
String a crimp bead and crimp to secure. Add another topaz pony bead and another crimp
bead. Crimp it.
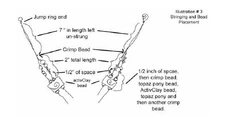
left side hole of the rectangular Activ-Clay bead. Also you will want to place the small bead
group in a slightly different place, using a different group of beads.
in different places only remembering the ½” of space before the rectangular bead. You want
the crimp bead, pony bead, crimp bead combo (after the ½” of space) to be in the same place so the wires lay nicely. Make sure they are not twisted before crimping the bead after
stringing it through the Activ-Clay bead.
create a space between the small rectangular beads and the large focal point rectangular
bead where the strands all come back together. The space this time is 2 ¼” in length, and
there is no need to leave any wire showing directly before entering the large Activ-Clay bead. On each of the 4 wires within the 2 ¼” space make.
13. On the jump ring strand split the two wires and begin stringing on one by creating one or
two grouping of beads suspended with crimp beads. This time filling up most of the space,
though do leave some wire showing in places. Use many of the crystal beads here.
When you reach the bottom of the 2 ¼” space (the top being just below the small clay bead
above) bring the two wires back together and string a Size 2 crimp bead and crimp. Next
thread these two wires down the top, left hole of the large rectangular bead. String another
Size #2 crimp and crimp it.
bead on it, no need to crimp. Double the wire in half and holding both ends together thread
down through the top right hole of the large rectangular bead. String a Size #2 crimp bead
on and crimp.
You will work on each wire individually placing random groups or individual beads with spaces of gold wire showing in between groups. Each bead or combination of beads will be held in place by a crimp bead above and below bead or group of beads.
Make each of the wires different using different beads and placing them in different places.
Trim the wires so each wire is a different length with the longest being 3 ¾” long. Trim wire
off ends so no wire is left showing on ends.