I am making a number of fun shaped clay ornaments using the Black Plus Air Dry Clay from ACTIVA. I have found this clay to be so very easy to work with. For this project I basically treated the clay as I would cookie dough and rolled it out to my desired thickness (less than 1/4 - 1/2 inch depending on the size of the ornament) just like making sugar cookies using cookie cutters. I used a cutting board that is reserved just for crafting and an old rolling pin. I skipped the pictures on the early process as most of have probably rolled out cookie dough or watched our moms and grandmas make a batch. Prior to cutting the shapes with my cookie cutters I grabbed a large swirl design rubber stamp and stamped right into the clay. This Altered Pages Patonce Cross stamp would be beautiful.

For my ornaments I used a large snow flake cutter and two different sized star shape cutters. I also tried out a small Christmas light bulb shape cutter. I used a wooden skewer to carefully make the hole for hanging purposes. I had a ton of fun and just made a whole bunch of them.

I can just imagine what these babies are going to look like after they are all completely dry when I will be able to paint them in beautiful metallics, add ribbons and trims, metal charm embellishments, beads and crystals. The possibilities are endless.

In this picture below they done are sitting pretty waiting to dry. They should be ready by tomorrow morning and I will start the final beautification process!

Once they are all done and prettied up they will be perfect for tying on packages as an extra gift,
a great homemade teacher gift and mostly likely at least a few will stay right here with us and hang on our tree for years to come.

Paining has begun...

Here Gabby is getting in on the fun. Most of these were painted using different colors of craft paints
For some of the ornaments, though Gabby actually used nail polish. She really loved some
colors she had as well as they little brush. She applied detail on a couple using a wooden
kitchen skewer.

Then, I started on the large snowflakes. These are about 3 to 4 inches...so not a petite ornament.
The base color that I chose for these was a pale China blue. It took a few coats to achieve the intensity that I wanted.

More layers being added.

Here the snowflakes are getting an additional layer of pearly white. The pictures just don't do them justice.

Here are a few of the cute little stars.
These will be given as teacher gifts and little extras here and there.
I just love how they turned out. Gabby will be sure to sign and date the backs of the ones she did as well.


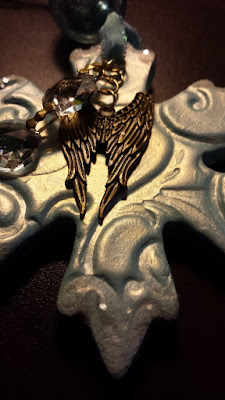
Here are the snowflakes with final coats of iridescent paint, charms, crystals and glitter.
Then they were hung with pretty dyed ribbons and large bobbles.
The charms were added by using simple jump rings threaded right
onto the ribbon prior to knotting it.


And, here they are hung in our Christmas tree in all their glory.
They are just so pretty. I know I've said it before (in this post even),
but the camera just does not capture all the dimension and sparkle.


I do love this shot in low light, though... it does capture some of the feel...